
How to swap tokens on 1inch: a step-by-step guide
On 1inch, you can swap tokens at the best rates across multiple networks. In this post, we’ll guide you through the process, explaining all the details.
How to swap on 1inch
1inch offers you several options for token swaps - from the simplest to the most sophisticated.
Whatever the market - whatever move you want to make - you’ll find tools designed for different trading needs.
Swap safely in a few clicks
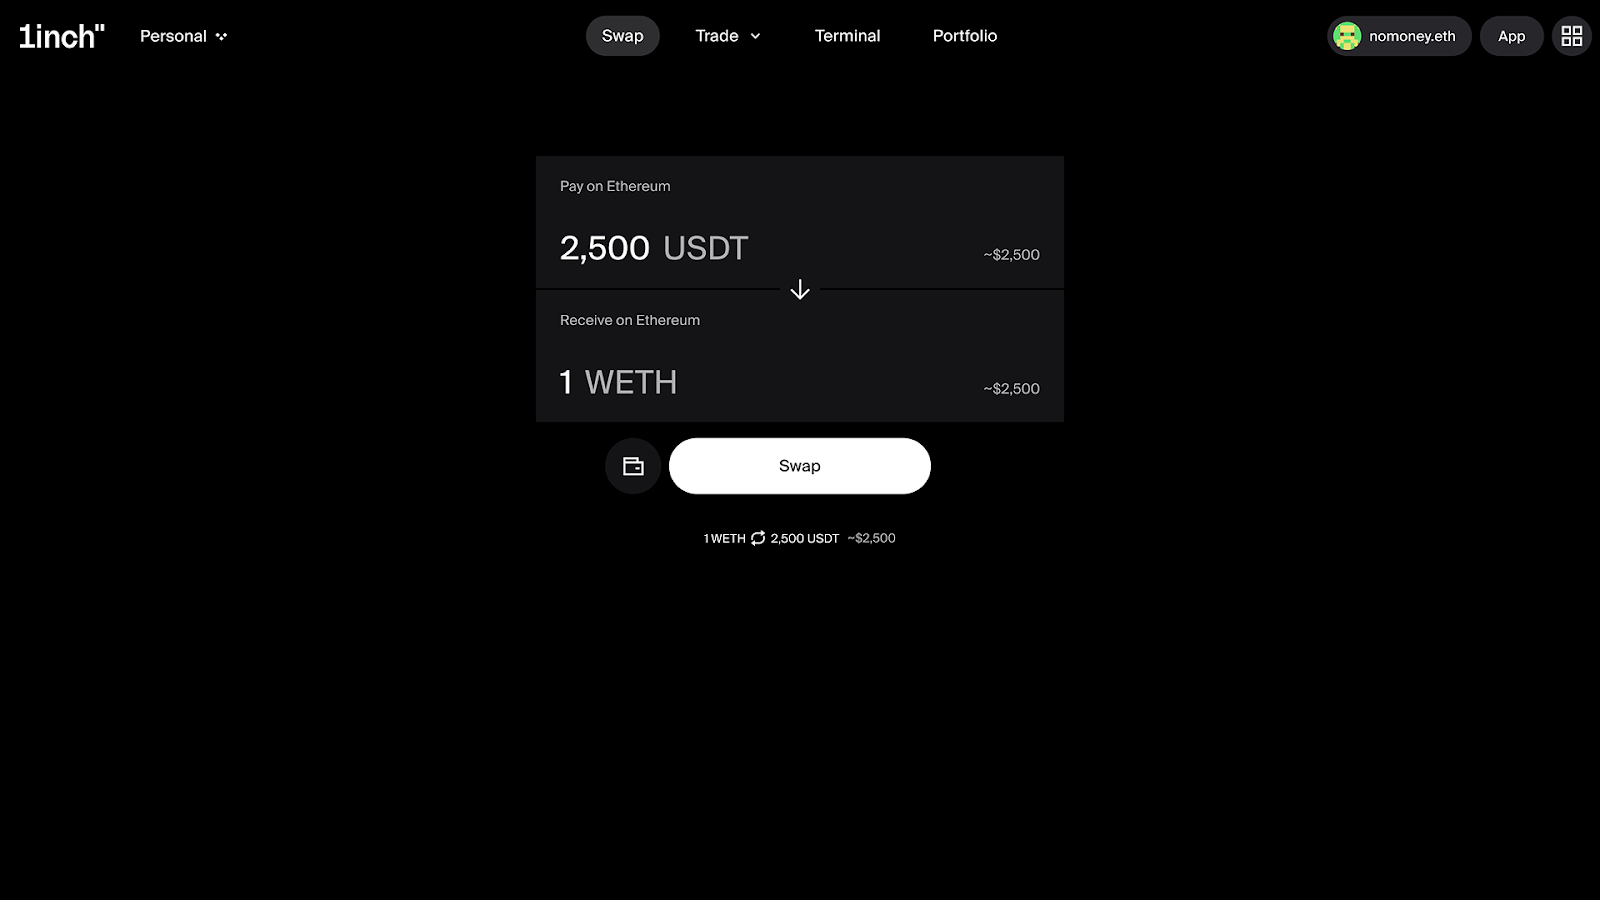
Here’s how the simplest option - Swap - works:
- Go to https://1inch.com/swap
- Click Get started
- Connect your wallet (more on connecting a wallet below)
- Choose the tokens you want to swap and receive and the networks
- Click Swap
- Sign the transaction
What you need to know in advance
Before you start your swap, there are a few things to keep in mind to make sure your swap goes smoothly.
Connecting the wallet
To do a token swap, you need to connect your wallet to the 1inch dApp. The 1inch dApp currently supports a wide range of DeFi wallets and connection options, including 1inch Wallet, Ledger Wallet, Binance Wallet, Wallet Connect, Trust Wallet, OKX Wallet, Crypto.com Wallet, Bitget Wallet and Coinbase Wallet.
Choose your wallet, scan the QR code with the respective wallet app on your smartphone, approve the connection in your wallet app.
Choosing the network
1inch swaps are cross-chain, which means you can swap tokens on one blockchain network for tokens on another blockchain network. However, you still need to make sure that the token you want to receive is available on the network where you want to receive it.
Using Trade Mode - Market
More experienced traders can take advantage of 1inch’s Trading Mode, which offers a clean, well-structured interface designed for clarity and control. In Trading Mode, you can choose between the Market and Limit options.
Here’s a step-by-step guide for using the Market option in Trade Mode.
Connecting the wallet
The process of connecting the wallet is described above.
Getting started
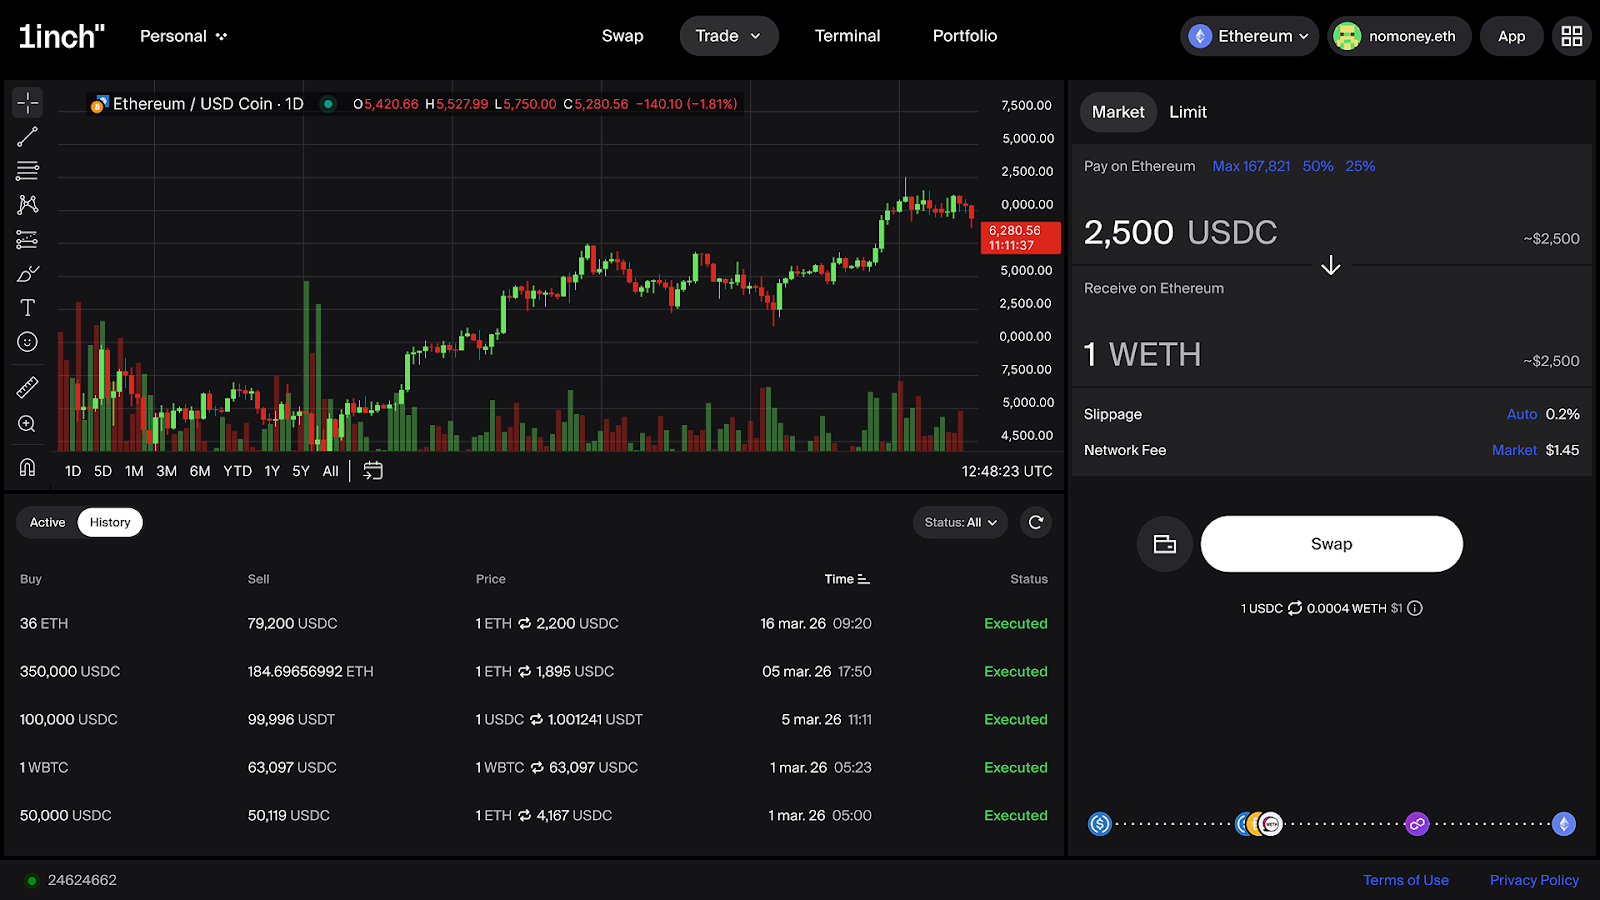
Go to the Trade tab and choose Market in the dropdown menu. You can also easily switch between the Market and Limit options inside Trade Mode.
Selecting chains and tokens
Select the tokens you want to swap and receive, as well as the networks. In the candlestick chart to the left of the swap form, you’ll be able to see the performance of the selected token pair over a chosen time period.
Selecting slippage and network fee
For slippage, you can choose between Auto (0.5%), presets of 0.1% and 1%, or set your own. The network fee presets are Aggressive and Market, but you can also set your own amount.
Finalizing the swap
Click “Swap.” You’ll be prompted to sign the transaction in your connected wallet. Make sure that all the data is correct, then sign the transaction.
Using the Trade Mode - Limit
In Trade Mode, you can also place a limit order. Here’s a step-by-step guide for using the Limit option in Trade Mode.
Connecting the wallet
The process of connecting the wallet is described above.
Getting started
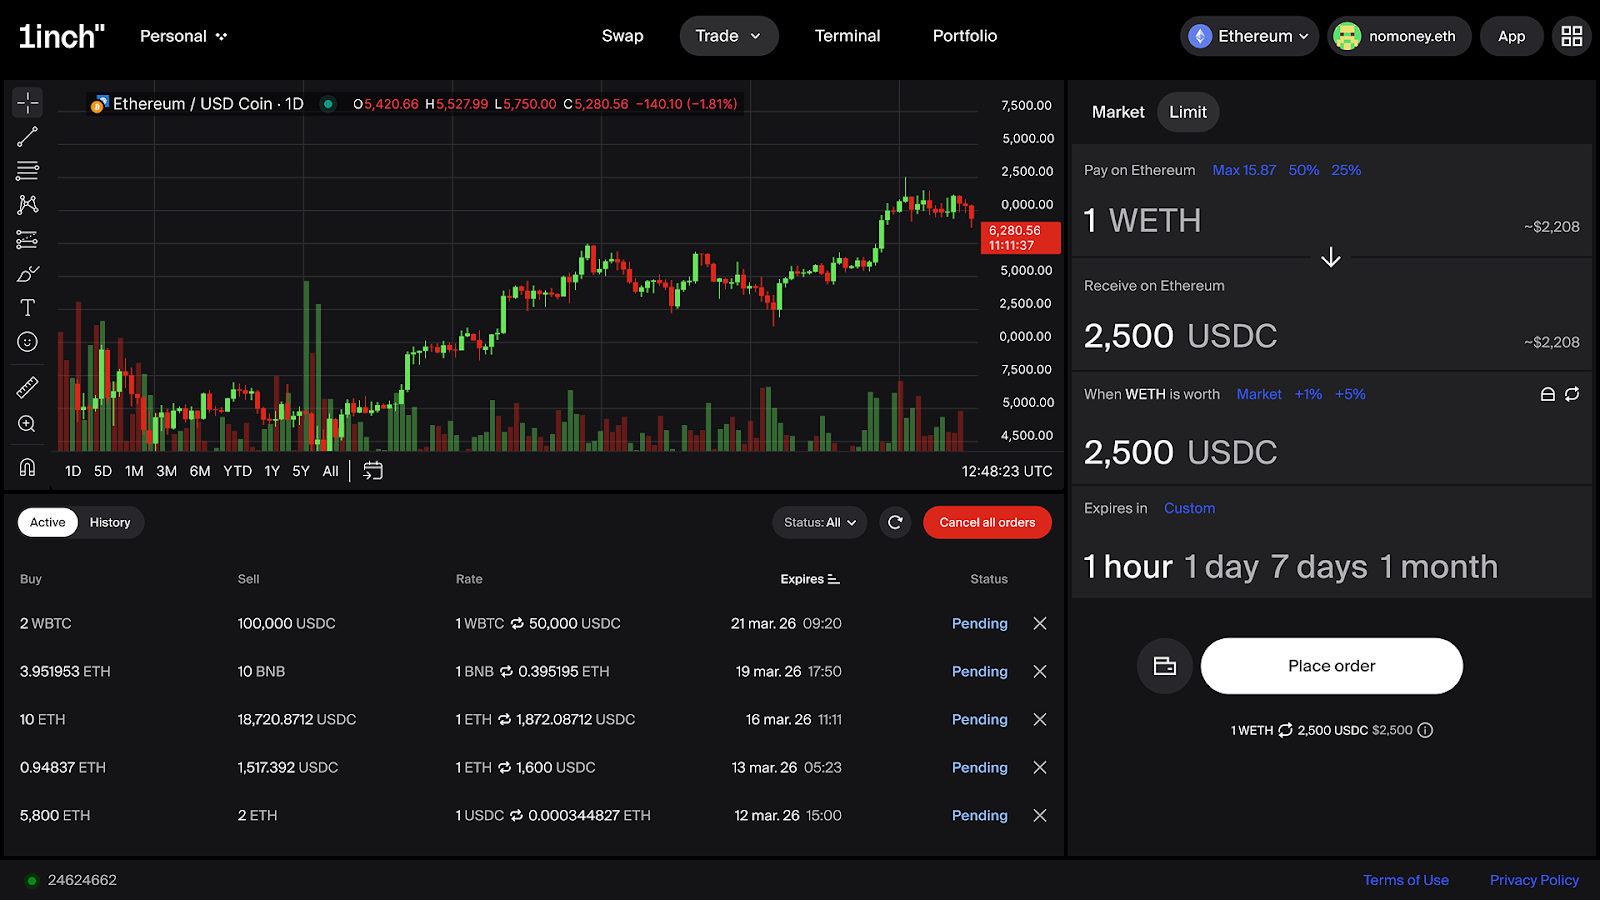
Go to the Trade tab and choose Limit in the dropdown menu. You can also easily switch between the Market and Limit options inside Trade Mode.
Selecting chains and tokens
Select the tokens you want to swap and receive, as well as the networks. In the candlestick chart to the left of the swap form, you’ll be able to see the performance of the selected token pair over a chosen time period.
Selecting the price
Select the price at which you want to sell your token. You can use the presets Spot, +1%, +5% or set your own price.
Selecting the expiry period
The presets are 1 hour, 1 day, 7 days and 1 month, and you also have a custom option.
Finalizing the swap
Click “Swap.” You’ll be prompted to sign the transaction in your connected wallet. Make sure that all the data is correct, then sign the transaction. Your swap will be executed when/if the price you selected is reached.
Using the Terminal
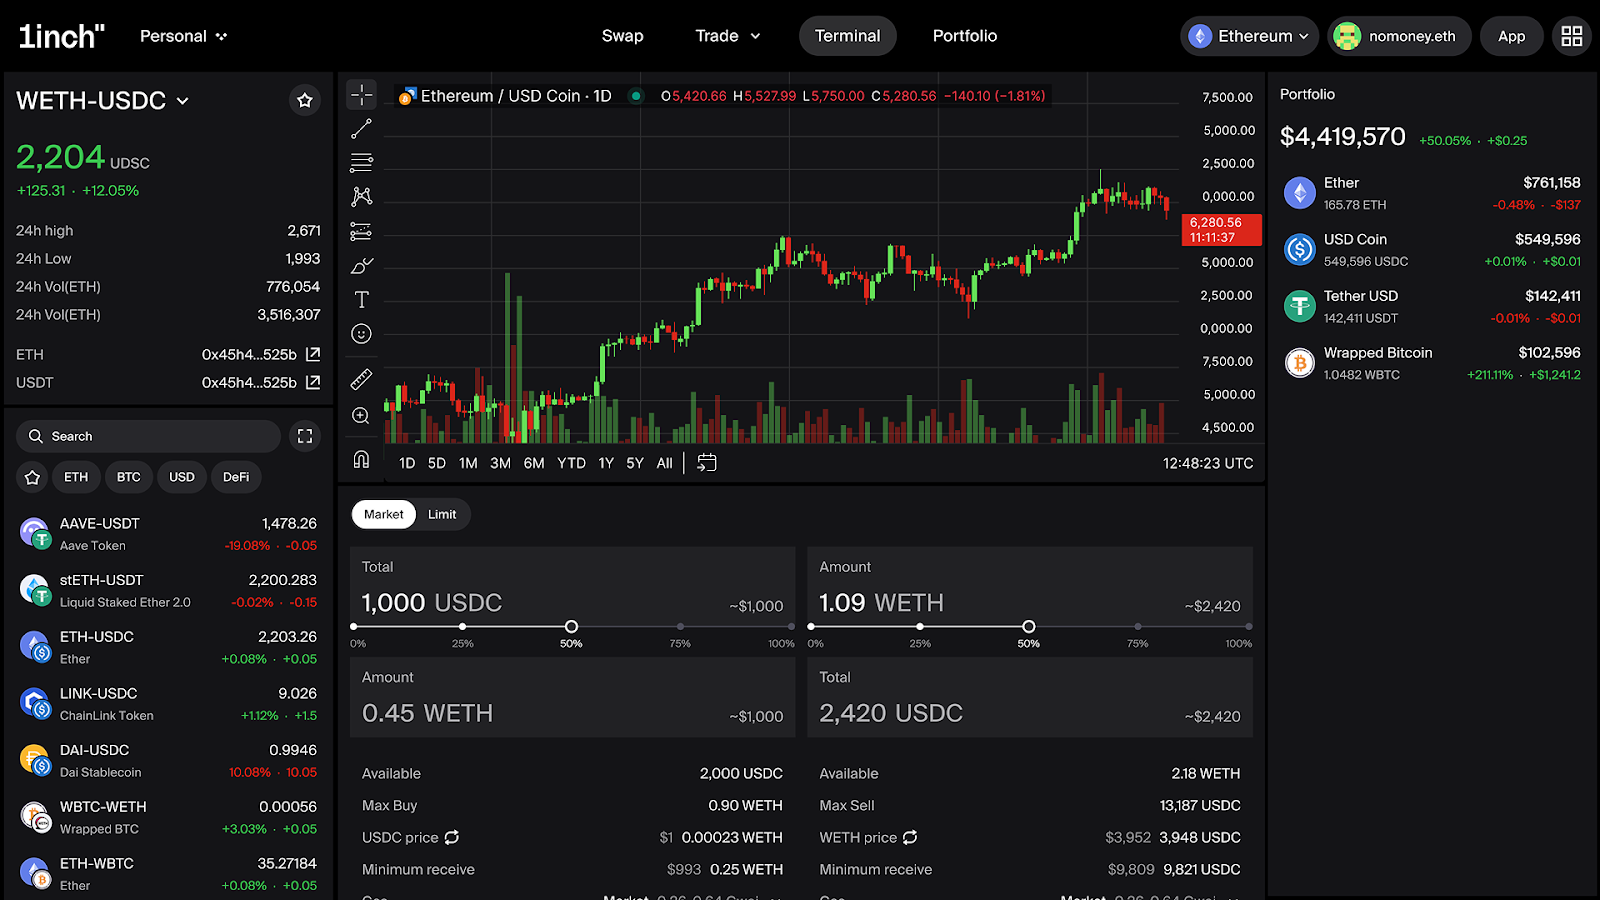
The Terminal is an advanced interface designed to deliver granular execution options, significant flexibility and advanced order functionality.
Here’s a step-by-step guide for doing a swap in the Terminal.
Connecting the wallet
The process of connecting the wallet is described above.
Getting started
Go to the Terminal tab. You’ll see a trading interface that includes a candlestick chart and a swap form. You can choose between the Market and Limit options.
Selecting chains and tokens
Select the tokens you want to swap and receive, as well as the networks.
Selecting settings
With the Market option, you can set Minimum receive, gas and slippage, using the presets or setting your own amounts. Alternatively, you can place a limit order.
Finalizing the swap
Click “Swap.” You’ll be prompted to sign the transaction in your connected wallet. Make sure that all the data is correct, then sign the transaction.
Why swaps can fail (and fixes)
- slippage too tightIf the price moves before the transaction is confirmed, the swap may fail. Increase the slippage tolerance slightly and resubmit the transaction.
- low liquidity / price impact too high Large trades or illiquid token pairs can lead to high price impact and failed swaps. Try swapping a smaller amount or splitting the trade into multiple transactions.
- approval not completed / rejectedThe swap cannot proceed unless you have approved the transaction in your connected wallet.
Safety checks before you confirm
Avoid fake links and typosquatting
Always make sure you are using the official 1inch interface and not a lookalike website. Attackers often create fake domains with small spelling changes to trick users into connecting their wallets. The safest approach is to access the dApp through the official 1inch website or trusted links you have bookmarked.
General OpSec
Operational security is your key to staying safe in DeFi. Check out detailed guidelines for staying safe in DeFi here.
FAQ
How do I swap tokens on 1inch?
Choose between Swap Mode, Trade Mode and the Terminal. Connect your wallet to the 1inch dApp, choose the tokens you want to swap, enter the amount, adjust settings (if needed), sign the transaction in your connected wallet.
What is slippage tolerance and what should I set it to?
Slippage tolerance defines how much the price can change between the moment you submit a swap and when it is executed. For most liquid pairs, a setting around 0.1%-0.5% is usually sufficient. If a transaction fails due to price movement, you may need to increase the slippage slightly.
Why did I receive fewer tokens than expected?
Token prices in DeFi can change between the time a swap is submitted and when it is confirmed on-chain. This price movement, combined with your slippage tolerance, can affect the final amount received. Fees or liquidity conditions may also influence the output amount.
What should I do if my swap fails?
If a swap fails, first check whether your slippage tolerance or gas settings are too low. You can try submitting the transaction again with slightly higher slippage or gas. If the issue persists, review the transaction details in your wallet or block explorer.
Can I swap tokens across chains?
Yes. 1inch supports cross-chain swaps through dedicated cross-chain functionality. This allows you to swap tokens between supported networks without manually bridging assets first.
Can my funds be lost in a swap transaction?
In most cases, if a swap fails, the tokens remain in your wallet and only the gas fee is spent. However, users should always verify token contracts and avoid interacting with malicious assets or phishing interfaces.
For news and updates from 1inch, subscribe to our newsletter!
Share the article


Recent Posts
What happens when a crypto liquidity provider meets MEV
Part of the ‘Liquidity issues in crypto’ series, this article breaks down MEV, the JIT liquidity attack on LP fees, and what Aqua changes for crypto liquidity providers.
Ondo RWAs on 1inch hit $2.5 bln in volume
Crypto markets may go up and down, but tokenized real-world assets (RWAs) are steadily gaining ground on-chain.

xStocks integrates the 1inch Swap API to improve RWA trading experience
A new partnership between 1inch and xStocks is set to improve on-chain liquidity and elevate the trading experience for tokenized real-world assets (RWA).